
Series of completed holes in the aluminum upright.Capture Date: Mar 31, 2018 11:43 PM•Views: 106No comments yet. All fields are required, fill in the form. Comment successfully added. Comment
|
Putting the pieces in position with the mirror face down.Capture Date: Apr 2, 2018 10:59 AM•Views: 106No comments yet. All fields are required, fill in the form. Comment successfully added. Comment
|
Using the doweling jig to make centered and parallel pilot holes.
Any misalignment of the flat head screws would show up easily on the exposed edges and back of the uprights. The jig improves confidence in putting the screws in properly.
Capture Date: Apr 2, 2018 11:16 AM•Views: 144
No comments yet. All fields are required, fill in the form. Comment successfully added. Comment
|
Driving the 2 inch long #12 screws flush with the surface of the uprights. This hole is a bit deep.
I used 2 inch long screws on the sides to attach the header and footer to the uprights.
I used 1 1/2 inch long screws on the back to attach the mirror to the uprights.
Capture Date: Apr 2, 2018 11:19 AM•Views: 135
No comments yet. All fields are required, fill in the form. Comment successfully added. Comment
|
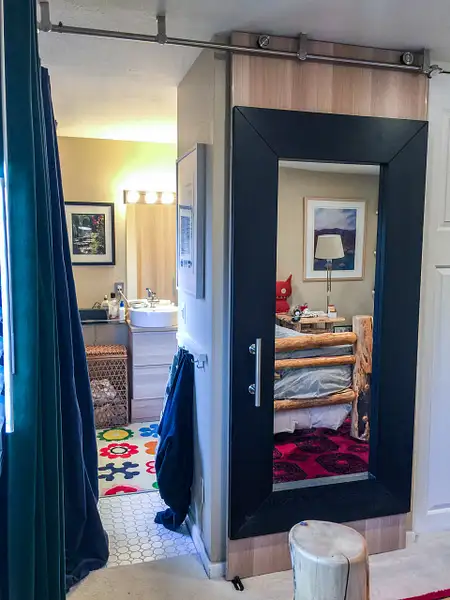
Completed door panel with White Oak veneer from back panel of an Askvoll wardrobe.
Extremely sturdy with the 1/8 inch thick aluminum uprights.
Capture Date: Apr 2, 2018 01:58 PM•Views: 119
No comments yet. All fields are required, fill in the form. Comment successfully added. Comment
|
Assembled door with white oak header panel held to mirror with aluminum uprights.Capture Date: Apr 2, 2018 01:58 PM•Views: 130No comments yet. All fields are required, fill in the form. Comment successfully added. Comment
|
Assembled door with white oak footer panel held to mirror with aluminum uprights.
We have owned the Mongstad mirror for years, and it has gotten a bit dinged up.
Capture Date: Apr 2, 2018 01:59 PM•Views: 132
No comments yet. All fields are required, fill in the form. Comment successfully added. Comment
|
I use Scotch Blue masking tape for these projects. Comes off easily without leaving any goo behind.
I am using this modern chrome ceiling mount rail system purchased from Amaxon:
https://www.amazon.com/gp/product/B01IZCJ5AU/ref=oh_aui_detailpage_o02_s01?ie=UTF8&psc=1
Capture Date: Apr 4, 2018 11:05 AM•Views: 119
No comments yet. All fields are required, fill in the form. Comment successfully added. Comment
|
Using a stud finder, I locate the joists in the ceiling. They are on 24 inch centers.Capture Date: Apr 5, 2018 10:00 PM•Views: 117No comments yet. All fields are required, fill in the form. Comment successfully added. Comment
|
I verify the exact location of the joist by drilling small holes through the drywall.
I want to put the screws for the brackets for the rail squarely in the center of the joists.
Capture Date: Apr 5, 2018 10:00 PM•Views: 108
No comments yet. All fields are required, fill in the form. Comment successfully added. Comment
|
I learn online that if the rail is not level, the door will slide slowly downhill.
The level is level, but the right side of the 4 foot long level is 1/4 inches below the ceiling. I will need to shim the brackets once I get their position on the ceiling set.
Capture Date: Apr 4, 2018 11:05 AM•Views: 108
No comments yet. All fields are required, fill in the form. Comment successfully added. Comment
|
Installing the brackets with predrilled pilot holes in the joists.Capture Date: Apr 5, 2018 10:21 PM•Views: 100No comments yet. All fields are required, fill in the form. Comment successfully added. Comment
|
Brackets up! Now to level them. There is a gentle slope downwards to the left.Capture Date: Apr 5, 2018 10:35 PM•Views: 112No comments yet. All fields are required, fill in the form. Comment successfully added. Comment
|
Making shims out of paint stir sticks. I also used popsicle sticks bought in the paint section.Capture Date: Apr 6, 2018 08:12 PM•Views: 303No comments yet. All fields are required, fill in the form. Comment successfully added. Comment
|
This is the biggest shim needed. Note filled holes from drilling to find the joist edge.Capture Date: Apr 7, 2018 06:13 PM•Views: 142No comments yet. All fields are required, fill in the form. Comment successfully added. Comment
|


No comments yet...
All fields are required, fill in the form.
Comment successfully added.
Comment