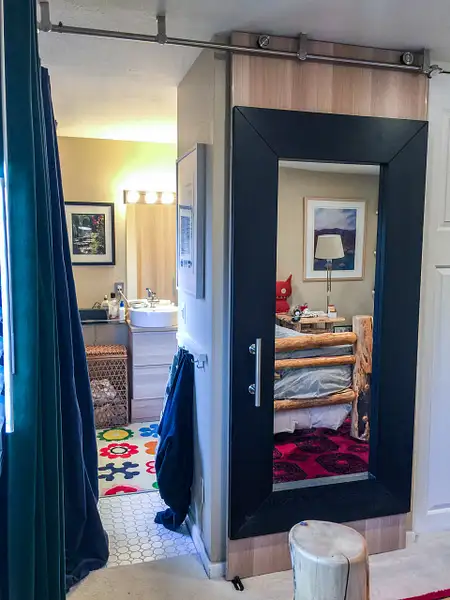

Master bathroom has never had a door separating it from the master bedroom. Inconvenient...Capture Date: Mar 31, 2018 06:59 PM•Views: 253No comments yet. All fields are required, fill in the form. Comment successfully added. Comment
|
The Mongstad mirror from IKEA has stood next to the opening for many years. I could make it a door!
How many things can you spot in this photo that come from IKEA? I count 9! The mirror over the sinks is from IKEA, I'll give you that one.
I will have to use a ceiling mount barn door hardware kit. No wall to mount the typical barn door rail. This means having to add header and footer panels to the mirror.
Capture Date: Mar 31, 2018 06:59 PM•Views: 502
No comments yet. All fields are required, fill in the form. Comment successfully added. Comment
|
Laying down the mirror on its front to measure it and confirm that it is an IKEA product.
This would you would see from inside the bathroom with the door closed. Not too bad, a bit "IKEAish."
Capture Date: Mar 31, 2018 10:24 PM•Views: 290
No comments yet. All fields are required, fill in the form. Comment successfully added. Comment
|
Yup, IKEA!Capture Date: Mar 31, 2018 10:24 PM•Views: 262No comments yet. All fields are required, fill in the form. Comment successfully added. Comment
|
Wall ready to patch and paint. I am leaving the IKEA curtain rail and painting in place.
This barn door won't be used that much, since we use the master bathroom just two times a day. Once in a while one of us sleeps in or goes to bed late, so the door will be used then. We don't have enough wall space elsewhere in the house to move the painting, so I am choosing to keep it there.
I am going to set up the barn door rail and rollers so that I can cut the IKEA Kvartal curtain rail in the future and have the door reach all the way to the wall. I will also buy a few more of the Kvartal ceiling mounts to have on hand should IKEA discontinue the product.
Capture Date: Apr 2, 2018 10:49 AM•Views: 288
No comments yet. All fields are required, fill in the form. Comment successfully added. Comment
|
Header and footer panels of 5/8 inch interior plywood. White Oak back panel from Askvoll wardrobe.
I was thinking of staining these pine surface panels with a white oak stain to match a closet door in the master bathroom that I had made from the side panels of an Askvoll wardrobe. I didn't have any more of the side panels left, which would have been ideal as header and footer panels for the door.
I found that I had the thin back panel for the inside of the wardrobe left over that has the White Oak finish. I used it as veneer to cover the plywood panels. This makes a perfect match with the closet door made from the Askvoll side panels..
Capture Date: Apr 1, 2018 12:17 PM•Views: 291
No comments yet. All fields are required, fill in the form. Comment successfully added. Comment
|
Using the header panel as a guide to cut the Askvoll back panel. Many firm passes with utility knife
I just didn't feel like getting the circular saw out and doing the tape/score/cut face down on a melamine board to keep the white oak melamine finish intact. This was a bit faster, I thought.
I cut over a pine board that you can't see, and changed the blade often.
Careful calculation showed that I did not have enough material if I put the grain of the Askvoll panel lengthwise. There was plenty if I used the panel vertically and cut multiple short vertical strips.
Capture Date: Apr 1, 2018 12:38 PM•Views: 267
No comments yet. All fields are required, fill in the form. Comment successfully added. Comment
|
Test fitting the cut Askvoll veneer panels on the header board.Capture Date: Apr 1, 2018 03:24 PM•Views: 245No comments yet. All fields are required, fill in the form. Comment successfully added. Comment
|
Contact cement applied, 20 minutes to dry...
Do this outside if possible! Using lots of contact cement gives off lots of interesting vapors.
Capture Date: Apr 1, 2018 03:38 PM•Views: 271
No comments yet. All fields are required, fill in the form. Comment successfully added. Comment
|
Askvoll veneer panels glued on. I used an orbital sander to remove excess veneer.Capture Date: Apr 1, 2018 03:51 PM•Views: 253No comments yet. All fields are required, fill in the form. Comment successfully added. Comment
|
Footer panel with veneer glued on.Capture Date: Apr 1, 2018 06:42 PM•Views: 239No comments yet. All fields are required, fill in the form. Comment successfully added. Comment
|
Finished header and footer panels.
A bit of a gap in the veneer at the bottom edge of the header panel. A bit of almond caulk will take care of that!
Capture Date: Apr 1, 2018 06:58 PM•Views: 237
No comments yet. All fields are required, fill in the form. Comment successfully added. Comment
|
Aluminium L-rails for the sides, 1 inch on each side, 1/8 inch thick. Easy to cut in miter box
These cost $25 each, the third most expensive item in the project, after the barn door kit ($190) and mirror ($99 many many years ago). The 1/16th thick L-rails were only $10, but felt too flimsy. I am glad that I used these thicker ones, they make the finished door quite solid feeling.
Capture Date: Mar 31, 2018 10:53 PM•Views: 242
No comments yet. All fields are required, fill in the form. Comment successfully added. Comment
|
Doweling jig to drilling pilot holes in aluminum uprights for header/footer panels and mirror.
Using the doweling jig with a nylon spacer to fill the drill guide allowed me to drill holes a precise distance from the back or side of the aluminum uprights.
The drill guides in the doweling kit are much too large for the 9/32 inch drill bit to make the pilot holes for the #12 screws I will use. A 1/4 inch outer diameter nylon spacer for a #6 bolt precisely aligns the drill bit.
Capture Date: Apr 1, 2018 07:53 PM•Views: 250
No comments yet. All fields are required, fill in the form. Comment successfully added. Comment
|
Each pilot hole is enlarged with a countersink to allow the flat head #12 screws to sit flush.
You see my beat up cordless drill here. This went much more quickly once I switched to my corded hammer drill (not in hammer mode).
Capture Date: Apr 1, 2018 08:18 PM•Views: 276
No comments yet. All fields are required, fill in the form. Comment successfully added. Comment
|


No comments yet...
All fields are required, fill in the form.
Comment successfully added.
Comment