The Blog
Search
Search
Exhibit
Fresh Photos
Editor's Choice Photos
Photoblogs
Upgrade
PRICING
Login
Start
Your 14-Day Free
Trial
Where you store your photos is as important as the photos you take.
Start Trial Now!
»
Back
Back
2018Apr Ikea Mirror Barn Door
By Willis Chung
;
Apr 07, 2018
56 Photos
Share Album
Justified View
Flow View
Square View
Grid View
Journal View
Highlight View
Large Photo View
Slideshow
Proofing View
TV View
RSS
Willis Chung
Featured
Gallery
Favorites
Contact
Contact
Menu
Back
Back
2018Apr Ikea Mirror Barn Door
Apr 07, 2018
56 Photos
Share Album
Justified View
Flow View
Square View
Grid View
Journal View
Highlight View
Large Photo View
Slideshow
Proofing View
TV View
RSS
Featured
Gallery
Favorites
Contact
Contact
Menu
×
Willis Chung's Gallery
2018Apr Ikea Mirror Barn Door
https://willischung.slickpic.com/albums/2018Apr-Ikea-Mirror-Barn-Door/photo/#14834161
Master bathroom has never had a door separating it from the master bedroom. Inconvenient...
https://willischung.slickpic.com/albums/2018Apr-Ikea-Mirror-Barn-Door/photo/#14834160
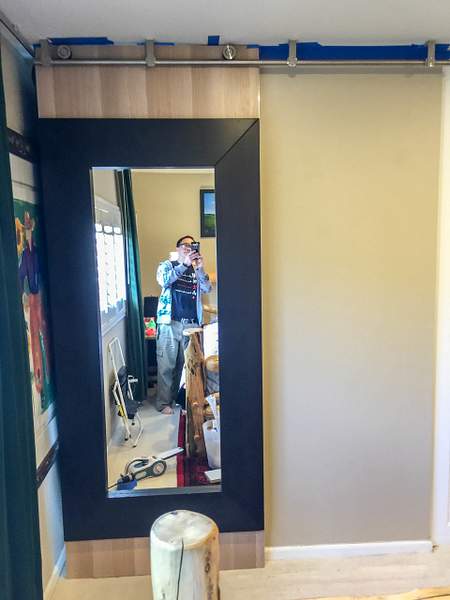
The Mongstad mirror from IKEA has stood next to the opening for many years. I could make it a door!
How many things can you spot in this photo that come from IKEA? I count 9! The mirror over the sinks is from IKEA, I'll give you that one. I will have to use a ceiling mount barn door hardware kit. No wall to mount the typical barn door rail. This means having to add header and footer panels to the mirror.
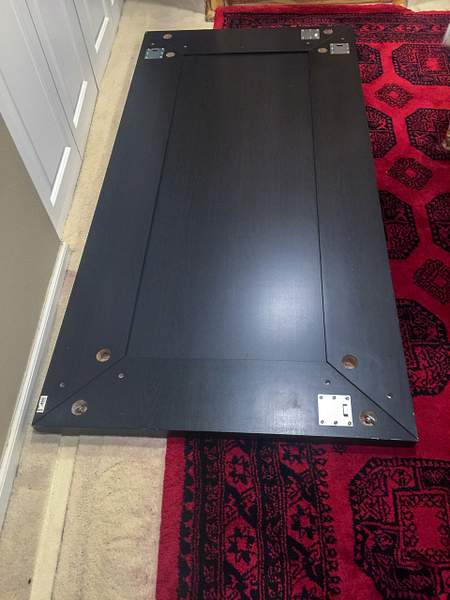
https://willischung.slickpic.com/albums/2018Apr-Ikea-Mirror-Barn-Door/photo/#14834159
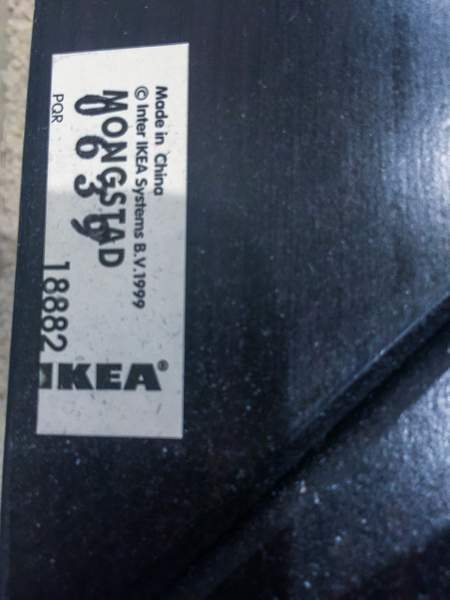
Laying down the mirror on its front to measure it and confirm that it is an IKEA product.
This would you would see from inside the bathroom with the door closed. Not too bad, a bit "IKEAish."
https://willischung.slickpic.com/albums/2018Apr-Ikea-Mirror-Barn-Door/photo/#14834158
Yup, IKEA!
https://willischung.slickpic.com/albums/2018Apr-Ikea-Mirror-Barn-Door/photo/#14834145
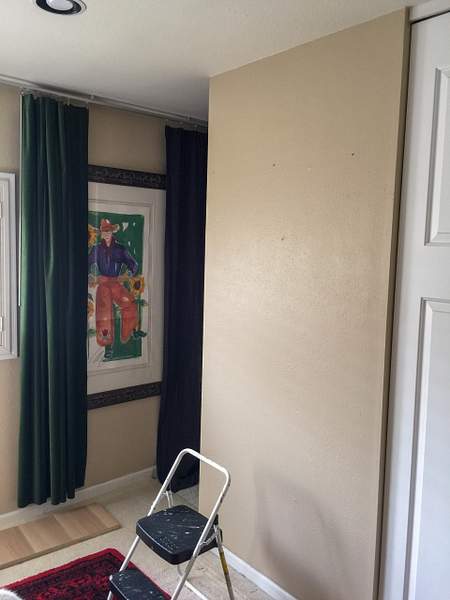
Wall ready to patch and paint. I am leaving the IKEA curtain rail and painting in place.
This barn door won't be used that much, since we use the master bathroom just two times a day. Once in a while one of us sleeps in or goes to bed late, so the door will be used then. We don't have enough wall space elsewhere in the house to move the painting, so I am choosing to keep it there. I am going to set up the barn door rail and rollers so that I can cut the IKEA Kvartal curtain rail in the future and have the door reach all the way to the wall. I will also buy a few more of the Kvartal ceiling mounts to have on hand should IKEA discontinue the product.
https://willischung.slickpic.com/albums/2018Apr-Ikea-Mirror-Barn-Door/photo/#14834155
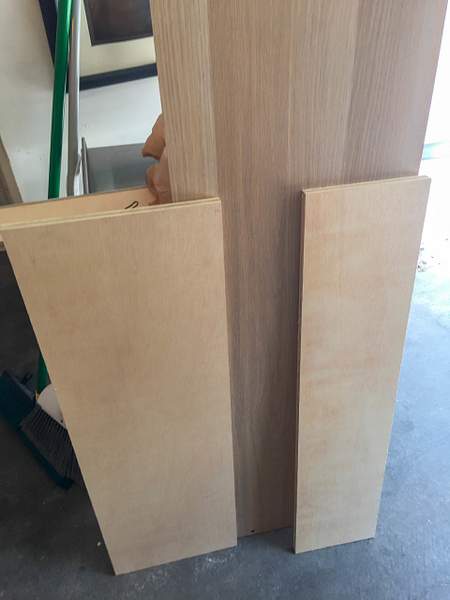
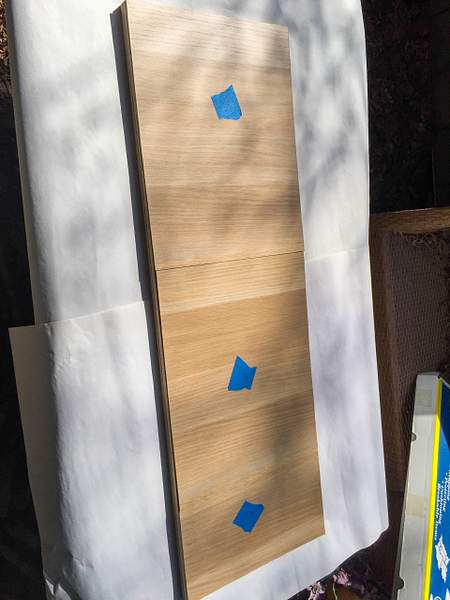
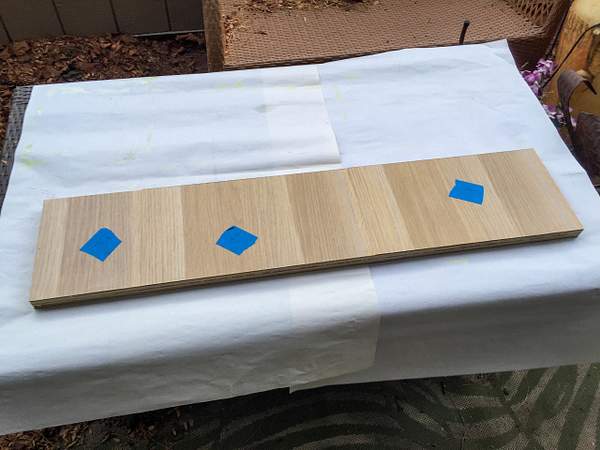
Header and footer panels of 5/8 inch interior plywood. White Oak back panel from Askvoll wardrobe.
I was thinking of staining these pine surface panels with a white oak stain to match a closet door in the master bathroom that I had made from the side panels of an Askvoll wardrobe. I didn't have any more of the side panels left, which would have been ideal as header and footer panels for the door. I found that I had the thin back panel for the inside of the wardrobe left over that has the White Oak finish. I used it as veneer to cover the plywood panels. This makes a perfect match with the closet door made from the Askvoll side panels..
https://willischung.slickpic.com/albums/2018Apr-Ikea-Mirror-Barn-Door/photo/#14834154
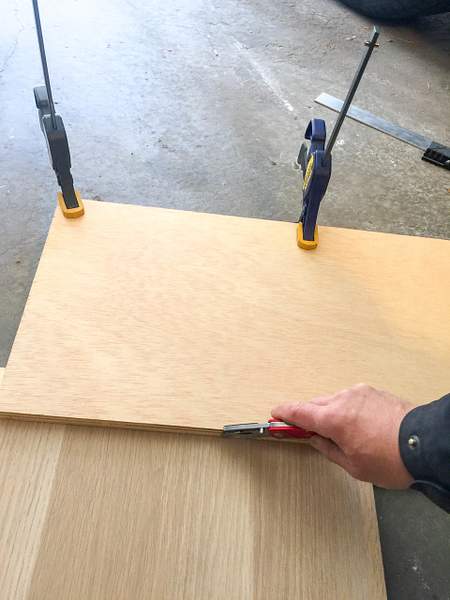
Using the header panel as a guide to cut the Askvoll back panel. Many firm passes with utility knife
I just didn't feel like getting the circular saw out and doing the tape/score/cut face down on a melamine board to keep the white oak melamine finish intact. This was a bit faster, I thought. I cut over a pine board that you can't see, and changed the blade often. Careful calculation showed that I did not have enough material if I put the grain of the Askvoll panel lengthwise. There was plenty if I used the panel vertically and cut multiple short vertical strips.
https://willischung.slickpic.com/albums/2018Apr-Ikea-Mirror-Barn-Door/photo/#14834153
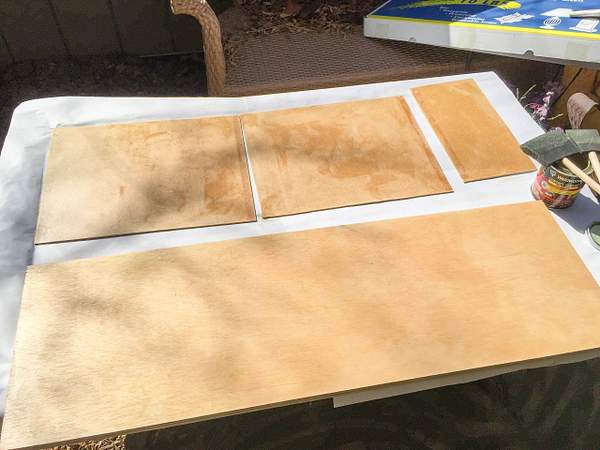
Test fitting the cut Askvoll veneer panels on the header board.
https://willischung.slickpic.com/albums/2018Apr-Ikea-Mirror-Barn-Door/photo/#14834152
Contact cement applied, 20 minutes to dry...
Do this outside if possible! Using lots of contact cement gives off lots of interesting vapors.
https://willischung.slickpic.com/albums/2018Apr-Ikea-Mirror-Barn-Door/photo/#14834151
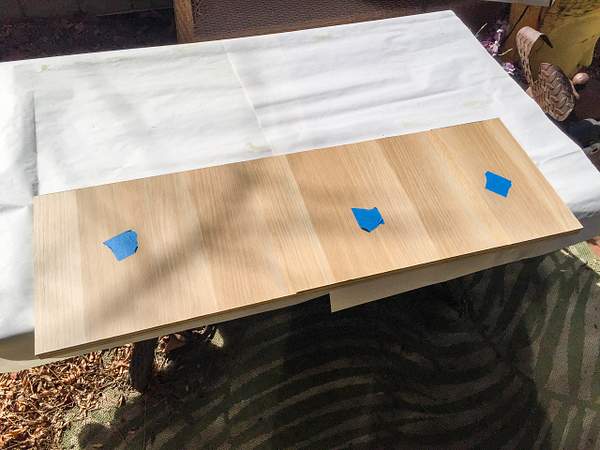
Askvoll veneer panels glued on. I used an orbital sander to remove excess veneer.
https://willischung.slickpic.com/albums/2018Apr-Ikea-Mirror-Barn-Door/photo/#14834150
Footer panel with veneer glued on.
https://willischung.slickpic.com/albums/2018Apr-Ikea-Mirror-Barn-Door/photo/#14834149
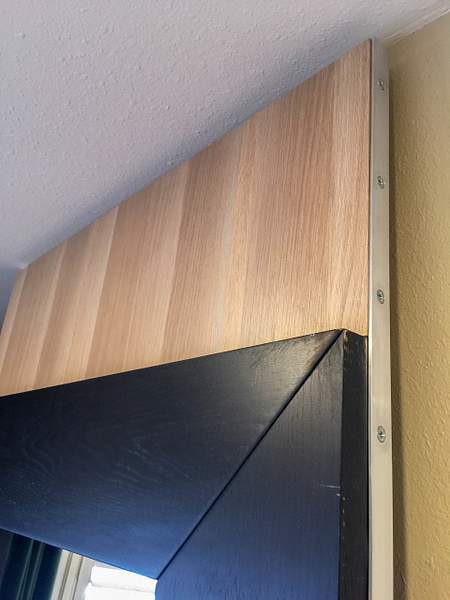
Finished header and footer panels.
A bit of a gap in the veneer at the bottom edge of the header panel. A bit of almond caulk will take care of that!
https://willischung.slickpic.com/albums/2018Apr-Ikea-Mirror-Barn-Door/photo/#14834157
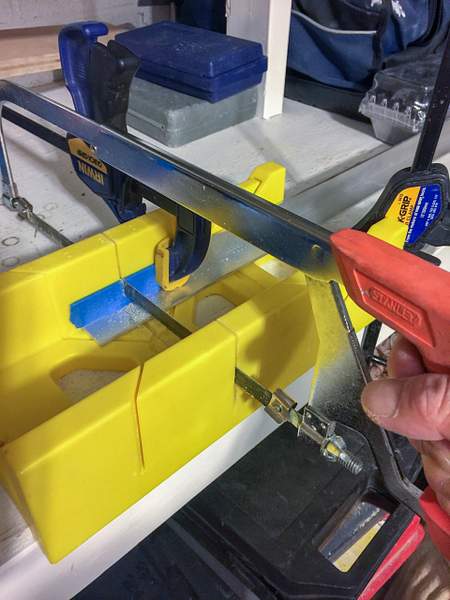
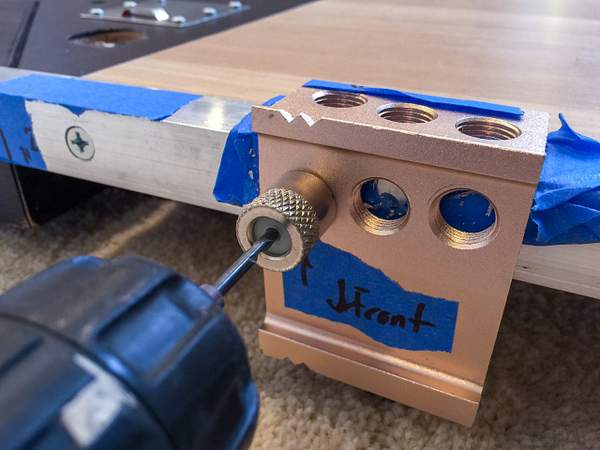
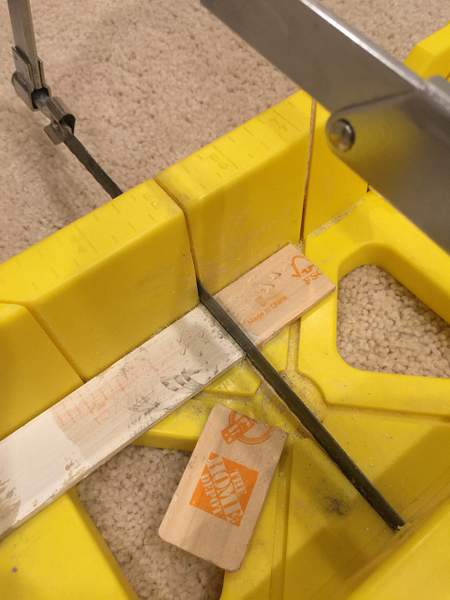
Aluminium L-rails for the sides, 1 inch on each side, 1/8 inch thick. Easy to cut in miter box
These cost $25 each, the third most expensive item in the project, after the barn door kit ($190) and mirror ($99 many many years ago). The 1/16th thick L-rails were only $10, but felt too flimsy. I am glad that I used these thicker ones, they make the finished door quite solid feeling.
https://willischung.slickpic.com/albums/2018Apr-Ikea-Mirror-Barn-Door/photo/#14834147
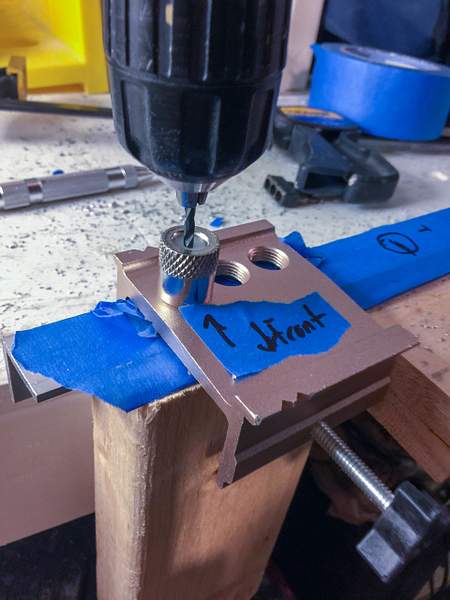
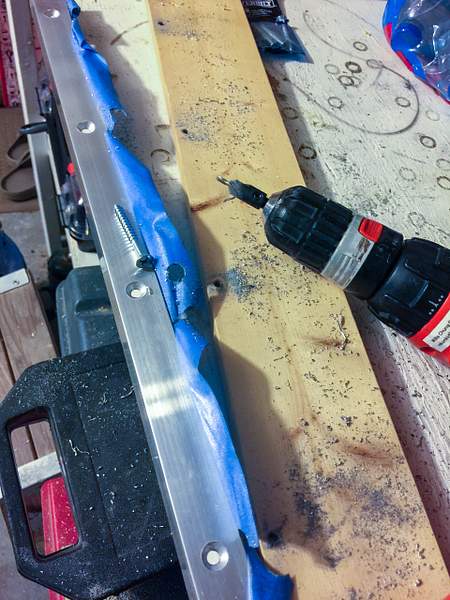
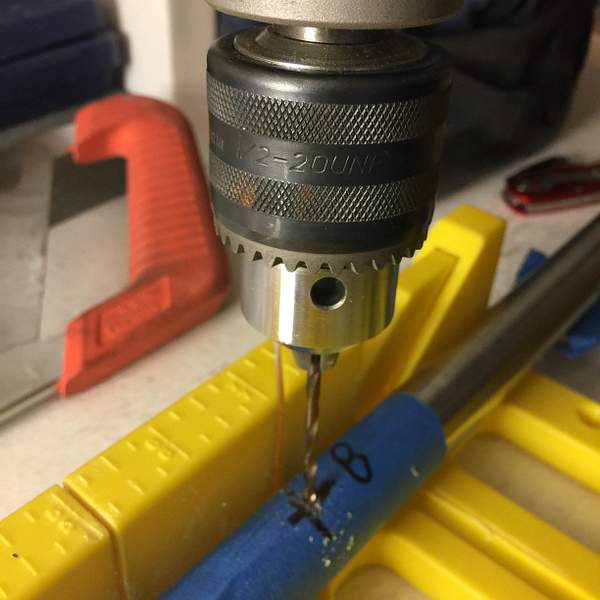
Doweling jig to drilling pilot holes in aluminum uprights for header/footer panels and mirror.
Using the doweling jig with a nylon spacer to fill the drill guide allowed me to drill holes a precise distance from the back or side of the aluminum uprights. The drill guides in the doweling kit are much too large for the 9/32 inch drill bit to make the pilot holes for the #12 screws I will use. A 1/4 inch outer diameter nylon spacer for a #6 bolt precisely aligns the drill bit.
https://willischung.slickpic.com/albums/2018Apr-Ikea-Mirror-Barn-Door/photo/#14834146
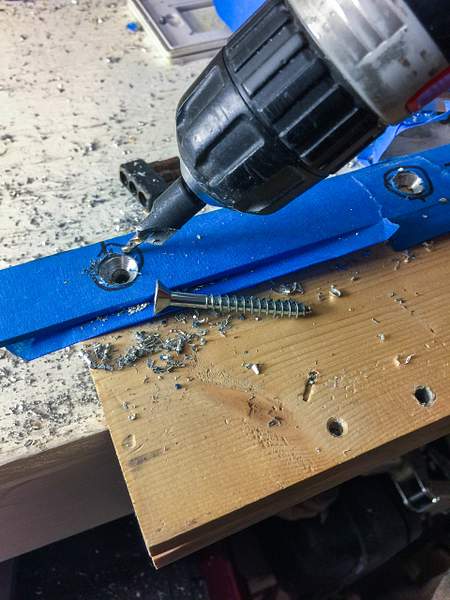
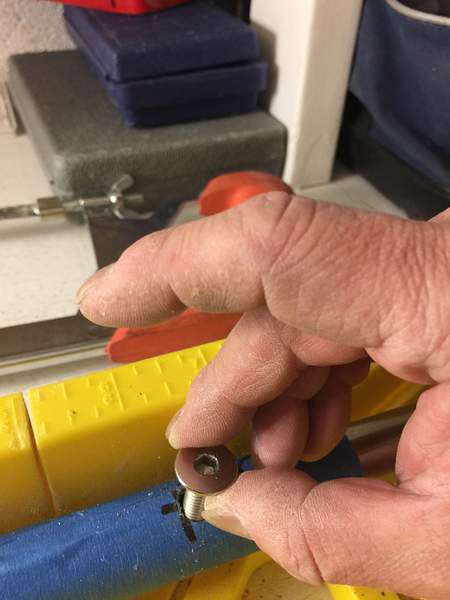
Each pilot hole is enlarged with a countersink to allow the flat head #12 screws to sit flush.
You see my beat up cordless drill here. This went much more quickly once I switched to my corded hammer drill (not in hammer mode).
https://willischung.slickpic.com/albums/2018Apr-Ikea-Mirror-Barn-Door/photo/#14834156
Series of completed holes in the aluminum upright.
https://willischung.slickpic.com/albums/2018Apr-Ikea-Mirror-Barn-Door/photo/#14834144
Putting the pieces in position with the mirror face down.
https://willischung.slickpic.com/albums/2018Apr-Ikea-Mirror-Barn-Door/photo/#14834143
Using the doweling jig to make centered and parallel pilot holes.
Any misalignment of the flat head screws would show up easily on the exposed edges and back of the uprights. The jig improves confidence in putting the screws in properly.
https://willischung.slickpic.com/albums/2018Apr-Ikea-Mirror-Barn-Door/photo/#14834142
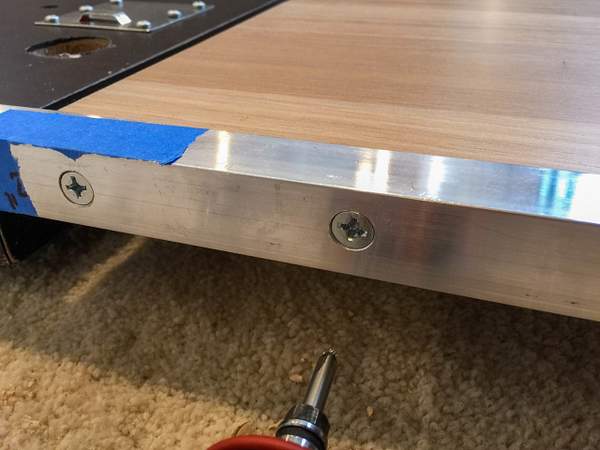
Driving the 2 inch long #12 screws flush with the surface of the uprights. This hole is a bit deep.
I used 2 inch long screws on the sides to attach the header and footer to the uprights. I used 1 1/2 inch long screws on the back to attach the mirror to the uprights.
https://willischung.slickpic.com/albums/2018Apr-Ikea-Mirror-Barn-Door/photo/#14834141
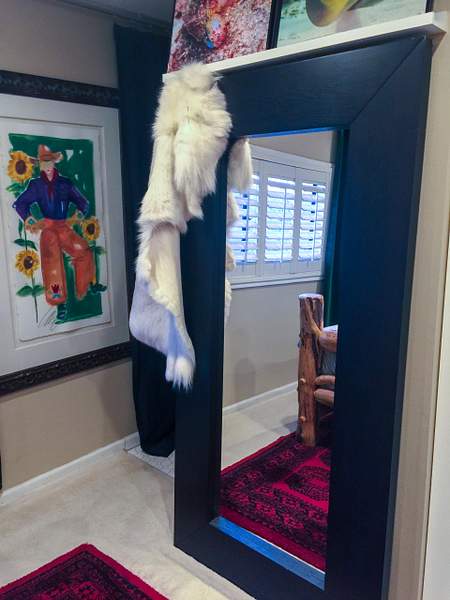
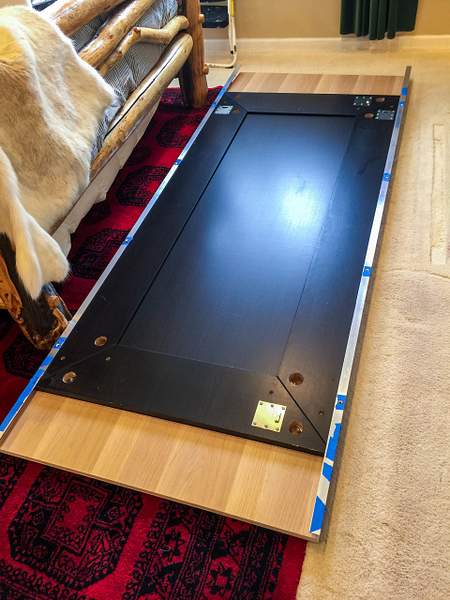
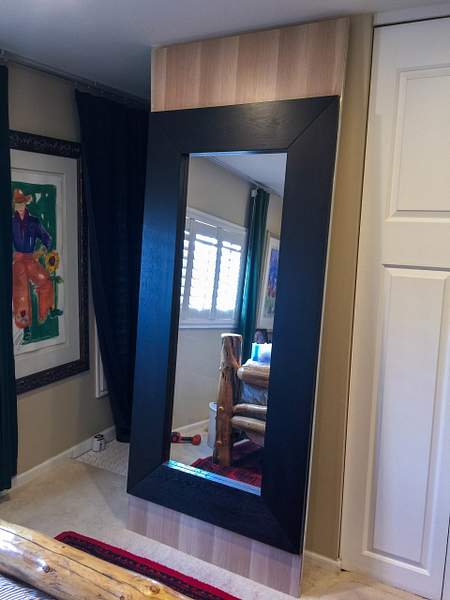
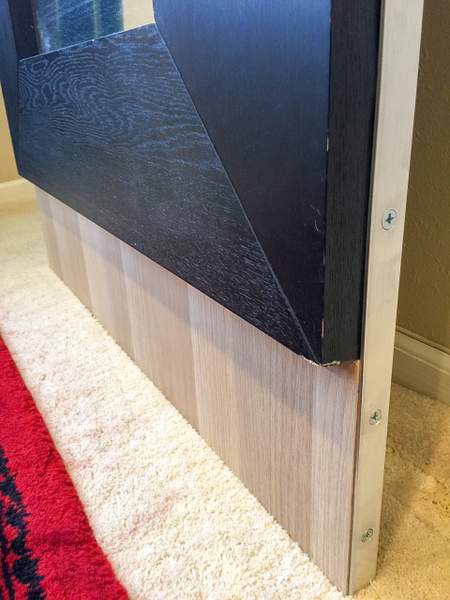
Completed door panel with White Oak veneer from back panel of an Askvoll wardrobe.
Extremely sturdy with the 1/8 inch thick aluminum uprights.
https://willischung.slickpic.com/albums/2018Apr-Ikea-Mirror-Barn-Door/photo/#14834140
Assembled door with white oak header panel held to mirror with aluminum uprights.
https://willischung.slickpic.com/albums/2018Apr-Ikea-Mirror-Barn-Door/photo/#14834139
Assembled door with white oak footer panel held to mirror with aluminum uprights.
We have owned the Mongstad mirror for years, and it has gotten a bit dinged up.
https://willischung.slickpic.com/albums/2018Apr-Ikea-Mirror-Barn-Door/photo/#14834137
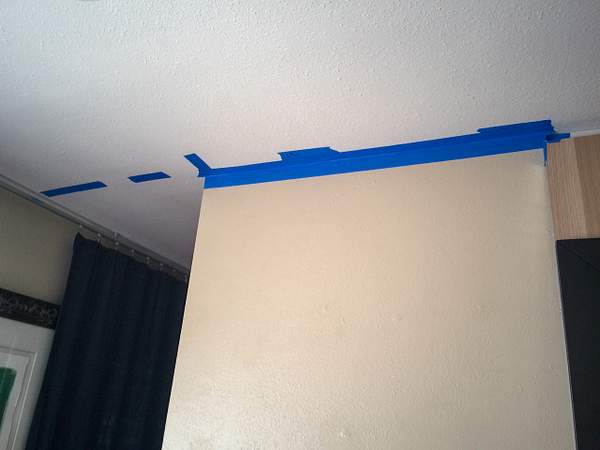
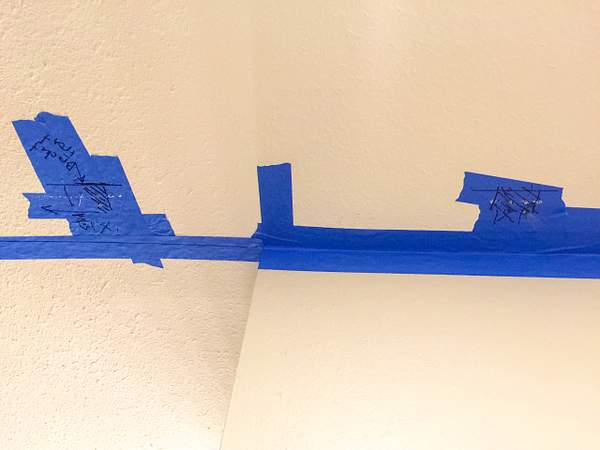
I use Scotch Blue masking tape for these projects. Comes off easily without leaving any goo behind.
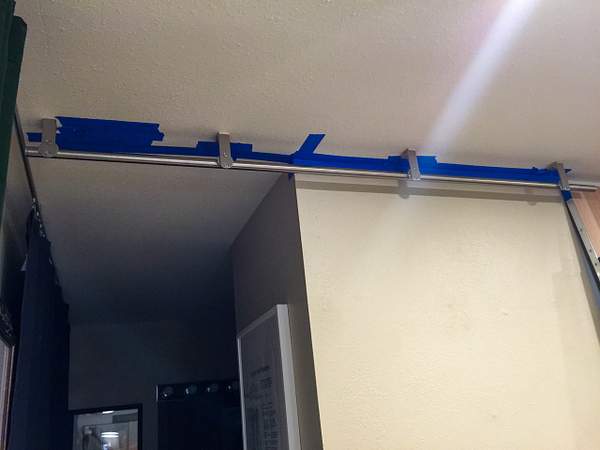
I am using this modern chrome ceiling mount rail system purchased from Amaxon: https://www.amazon.com/gp/product/B01IZCJ5AU/ref=oh_aui_detailpage_o02_s01?ie=UTF8&psc=1
https://willischung.slickpic.com/albums/2018Apr-Ikea-Mirror-Barn-Door/photo/#14834136
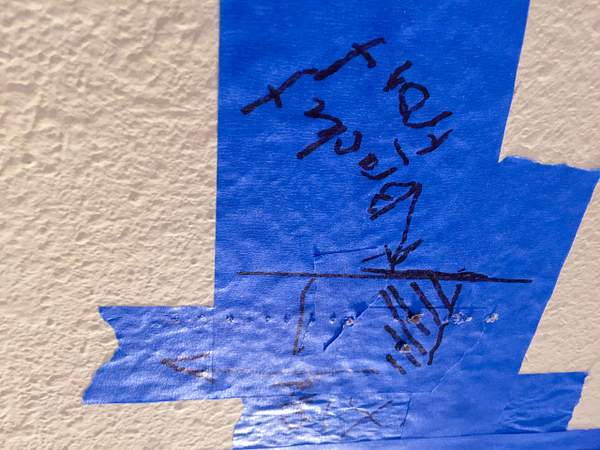
Using a stud finder, I locate the joists in the ceiling. They are on 24 inch centers.
https://willischung.slickpic.com/albums/2018Apr-Ikea-Mirror-Barn-Door/photo/#14834135
I verify the exact location of the joist by drilling small holes through the drywall.
I want to put the screws for the brackets for the rail squarely in the center of the joists.
https://willischung.slickpic.com/albums/2018Apr-Ikea-Mirror-Barn-Door/photo/#14834138
I learn online that if the rail is not level, the door will slide slowly downhill.
The level is level, but the right side of the 4 foot long level is 1/4 inches below the ceiling. I will need to shim the brackets once I get their position on the ceiling set.
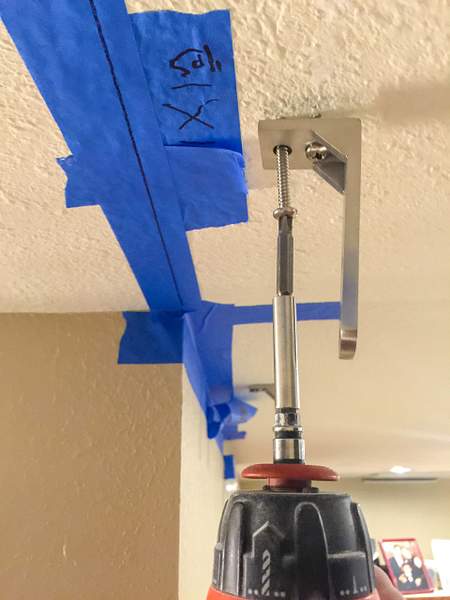
https://willischung.slickpic.com/albums/2018Apr-Ikea-Mirror-Barn-Door/photo/#14834134
Installing the brackets with predrilled pilot holes in the joists.
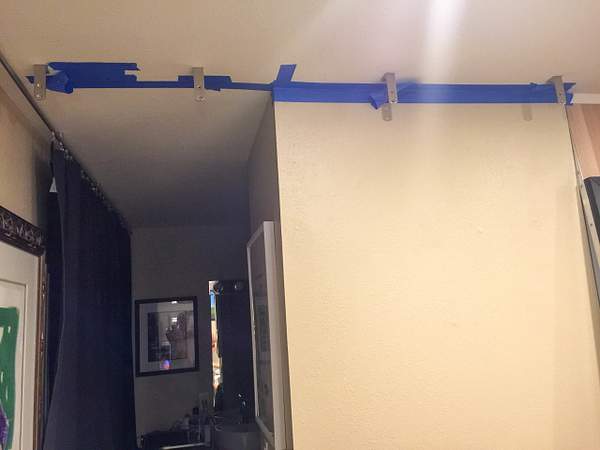
https://willischung.slickpic.com/albums/2018Apr-Ikea-Mirror-Barn-Door/photo/#14834133
Brackets up! Now to level them. There is a gentle slope downwards to the left.
https://willischung.slickpic.com/albums/2018Apr-Ikea-Mirror-Barn-Door/photo/#14834132
Making shims out of paint stir sticks. I also used popsicle sticks bought in the paint section.
https://willischung.slickpic.com/albums/2018Apr-Ikea-Mirror-Barn-Door/photo/#14834105
This is the biggest shim needed. Note filled holes from drilling to find the joist edge.
https://willischung.slickpic.com/albums/2018Apr-Ikea-Mirror-Barn-Door/photo/#14834131
Adjusting placement of the anchors on the rail. Original placement didn't line up with the joists.
The pre-drilled holes for the 4 brackets are spaced evenly, but don't line up with the joists. I didn't want to rely on hollow wall anchors or toggle bolts to hold the brackets for a door in the ceiling. I am drilling new holes on the back side of the rail. which will become the new front of the rail Two of the pre-drilled holes in the new back will be visible from inside the bathroom, but I will plug them for a more finished look. I did manage to get 2 of the 4 holes drilled in proper alignment on the first try. The other two holes had to be lengthened using a Dremel tool with a grinding bit.
https://willischung.slickpic.com/albums/2018Apr-Ikea-Mirror-Barn-Door/photo/#14834130
Making sure the anchoring bolt will fit into the new hole.
There is a short metal cylinder inside the steel rail, with a hole through it drilled and tapped for the M8 x 1.25 bolt. A nice clean look.
https://willischung.slickpic.com/albums/2018Apr-Ikea-Mirror-Barn-Door/photo/#14834129
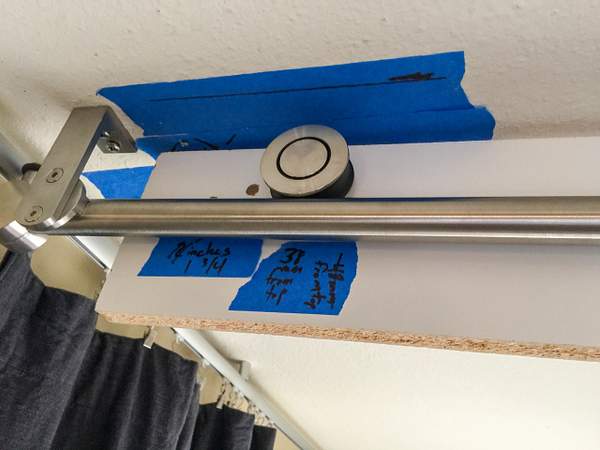
Rail mounted securely to ceiling and leveled with wood shims.
https://willischung.slickpic.com/albums/2018Apr-Ikea-Mirror-Barn-Door/photo/#14834128
Figuring out where to put the rollers using a test panel. I have only 1/4 inch clearance.
This kit comes with incorrect measurements in the instructions, and previous reviewers have had to redrill and patch their doors. Best to take a board and drill candidate holes and run the board back and forth to make sure the rollers are in a good spot. The spacing from the left edge of the door will allow the door to reach the wall if the curtain rail is cut. A fancy stopper supplied with the rail is partly off the left edge of the photo, and is attached to the rail to prevent it from getting lost. If the rail is cut, this will stop the door just before it touches the wall.
https://willischung.slickpic.com/albums/2018Apr-Ikea-Mirror-Barn-Door/photo/#14834127
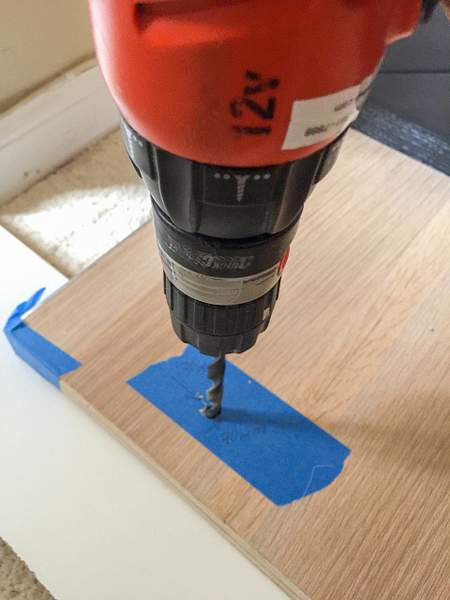
Measurements checked 3 times, time to drill the 8mm diameter holes in the header panel.
Drilling over the melamine roller test panel to prevent tearing of the veneer on the back side.
https://willischung.slickpic.com/albums/2018Apr-Ikea-Mirror-Barn-Door/photo/#14834126
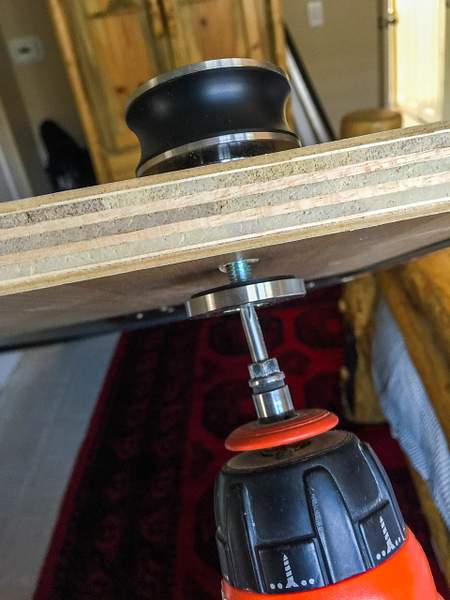
Putting rollers on to header panel. Needed shorter 8mm flat head screws.
The header panel is thinner than most standard doors, so I had to get shorter 8mm x 1.25 bolts.
https://willischung.slickpic.com/albums/2018Apr-Ikea-Mirror-Barn-Door/photo/#14834125
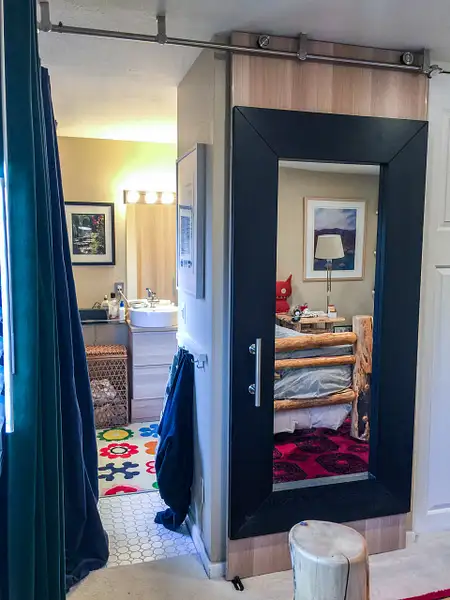
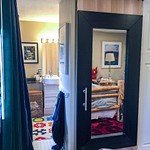
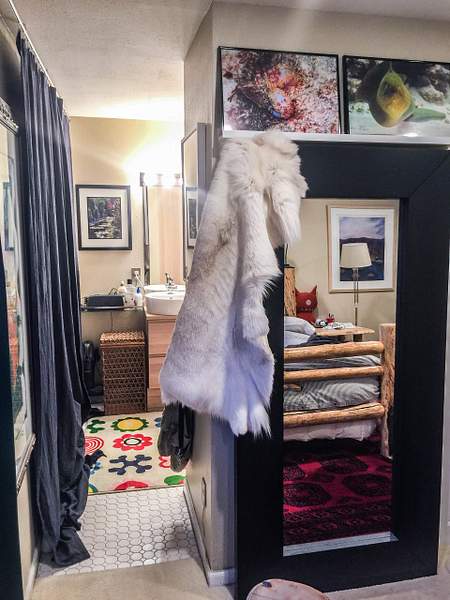
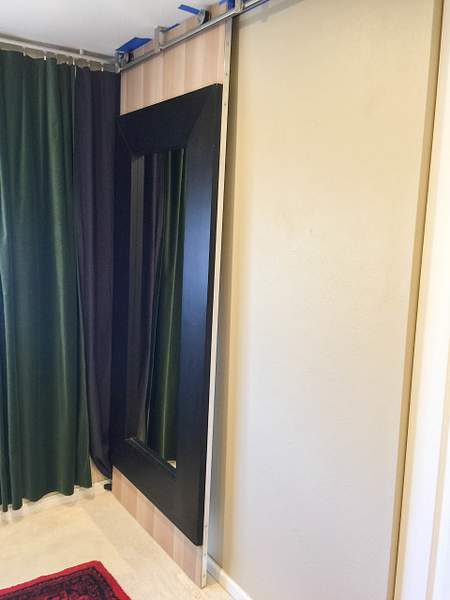
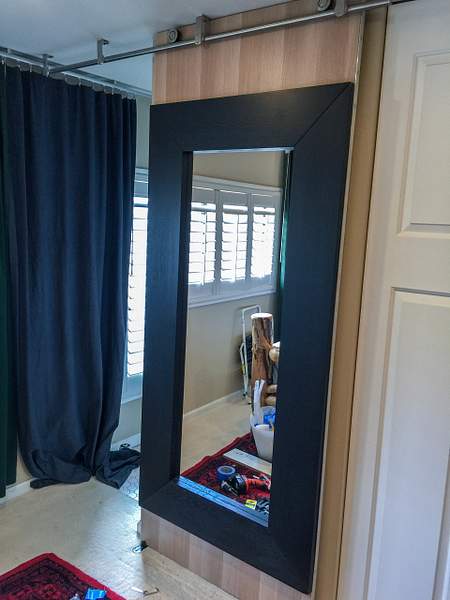
Door hung! Fits perfectly top/bottom. Doesn't roll on its own.
https://willischung.slickpic.com/albums/2018Apr-Ikea-Mirror-Barn-Door/photo/#14834124
Door slid shut, even gaps at ceiling and floor.
https://willischung.slickpic.com/albums/2018Apr-Ikea-Mirror-Barn-Door/photo/#14834123
Left to hang on its own, the door's lower edge leans out. I figured this would happen.
https://willischung.slickpic.com/albums/2018Apr-Ikea-Mirror-Barn-Door/photo/#14834122
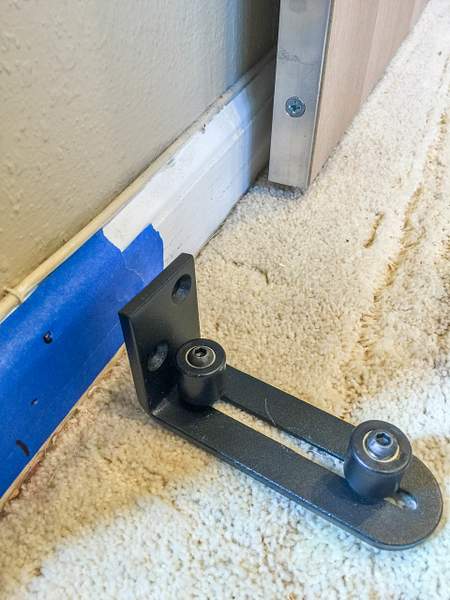
II ordered this roller from Amazon, with two adjustable rollers.
https://willischung.slickpic.com/albums/2018Apr-Ikea-Mirror-Barn-Door/photo/#14834121
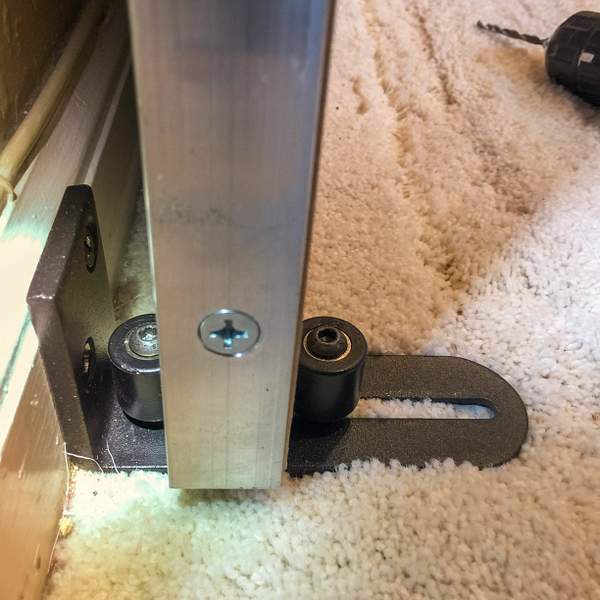
Roller bracket screwed to wall, door now is perfectly vertical and slides smoothly.
https://willischung.slickpic.com/albums/2018Apr-Ikea-Mirror-Barn-Door/photo/#14834120
The floor roller isn't too obtrusive.
https://willischung.slickpic.com/albums/2018Apr-Ikea-Mirror-Barn-Door/photo/#14834119
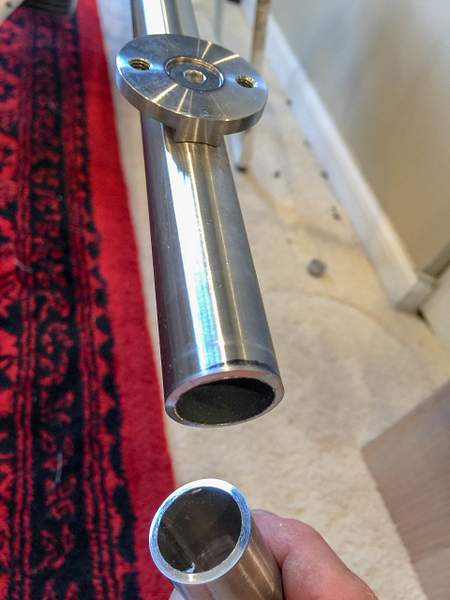
Ooops! I forgot to cut the right end of the rail off to clear the bifold closet doors.
I actually didn't think about this until I had gotten this far. Happily it is easy to roll the door off the rail and 8 screws take the rail off the brackets.
https://willischung.slickpic.com/albums/2018Apr-Ikea-Mirror-Barn-Door/photo/#14834118
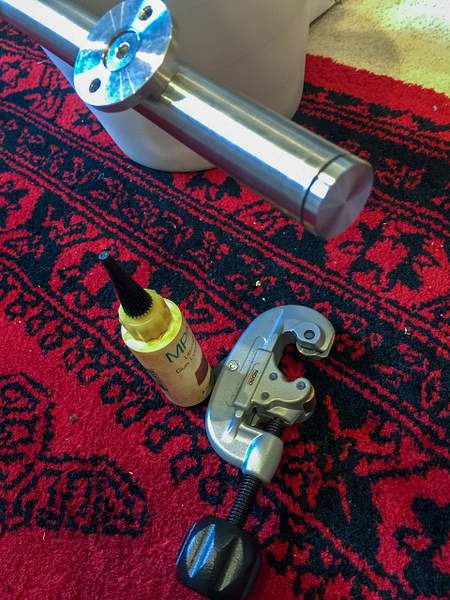
Using a tubing cutter to make a clean cut in the steel rail. Oil helps cool the cutting wheel.
https://willischung.slickpic.com/albums/2018Apr-Ikea-Mirror-Barn-Door/photo/#14834117
Many many turns around the rail, tightening the cutting wheel just a bit each time. Smooth cut!
https://willischung.slickpic.com/albums/2018Apr-Ikea-Mirror-Barn-Door/photo/#14834116
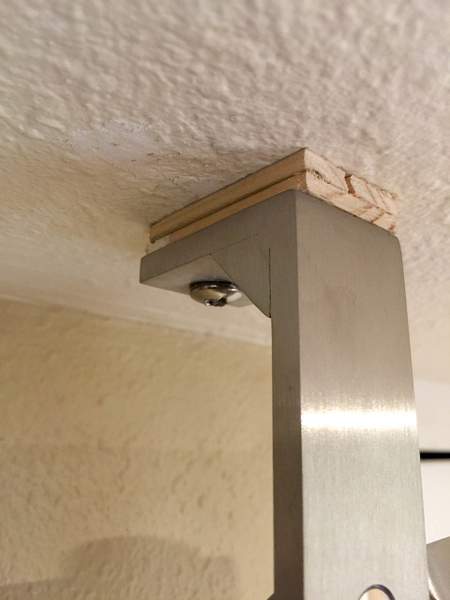
Trim cap back on the end of the rail.
https://willischung.slickpic.com/albums/2018Apr-Ikea-Mirror-Barn-Door/photo/#14834115
Rail back up and door back on. Using a pipe clamp as a stopper on the left.
https://willischung.slickpic.com/albums/2018Apr-Ikea-Mirror-Barn-Door/photo/#14834114
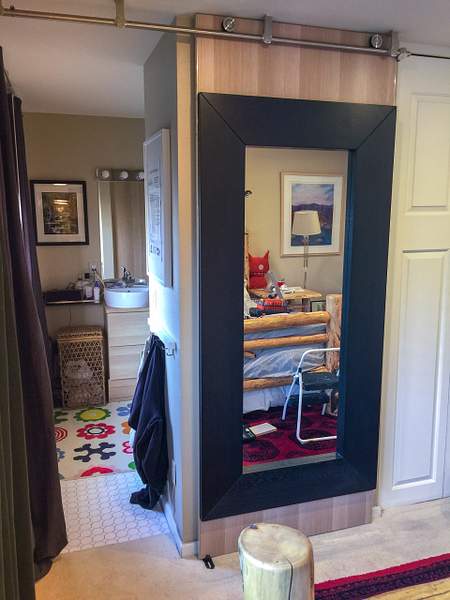
Mirror door in place, right sided stopper in place at the end of the rail.
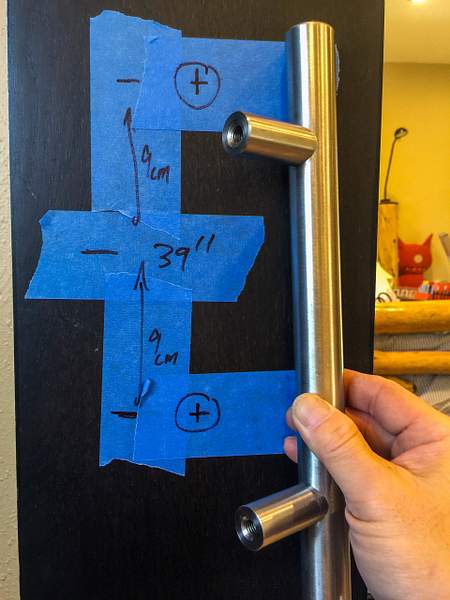
https://willischung.slickpic.com/albums/2018Apr-Ikea-Mirror-Barn-Door/photo/#14834113
Marking holes for tubular steel barn door handle. Mix of English and Metric measurements.
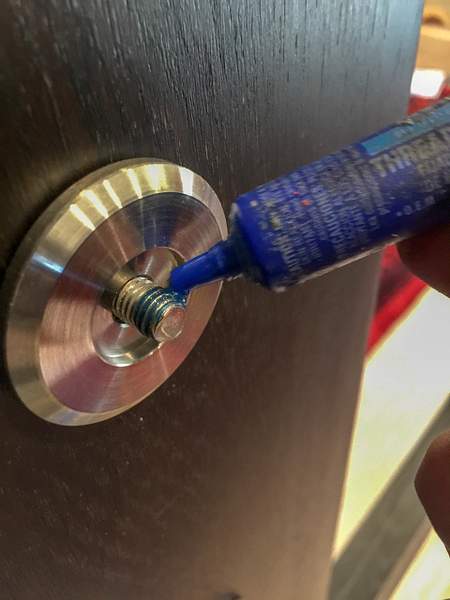
https://willischung.slickpic.com/albums/2018Apr-Ikea-Mirror-Barn-Door/photo/#14834112
8mm holes drilled. The panel is hollow, limiting tightening of screws. Need to use threadlocker.
2018Mar The Breakers with Ben
2017Mar Prague
Day 1 Bishop Museum Quick Visit
Day 1 Hawaii State Art Museum
Day 0 Laylow Waikiki Short Stay
2022 May Oahu
2019July American Heritage Museum
2019July Northeastern southwest campus
2019July 4th Of July in Boston with the Elliotts
2019 July Boston Visit With John
2019Aug Japan
2019Mar Oahu
2019Mar Yayoi Kusama Bellagio Gallery of Fine Art
2006Sep Streamside Drive
2018Aug Nashville
2017May Capitol Reef National Park, Utah
2017Nov Ethyl M Cactus Garden Holiday Lights LV NV
2017Nov Boston Visit
2018Sep Hoover Dam
2018Aug Boston Visit
2018Aug Boston Fenway Ducks
2018May Prague
2018May Budapest
2018Mar Battleship Cove
2018Mar The Breakers with Ben
2018Apr Ikea Mirror Barn Door
2017Mar Prague
2017Mar Budapest
2017Nov Las Vegas High School Rodeo
2017Sep Seven Magic Mountains, Las Vegas, NV
2017Sep International Car Forest of the Last Church, Goldfield, Nevada
2017Sep Bullfrog-Rhyolite Cemetery
2017Sep Goldwell Open Air Museum, Rhyolite NV
2017Sep Tom Kelly's Bottle House, Rhyolite, NV
2017Sep Rhyolite NV Ghost Town
2017Sep Las Vegas Pinball Hall of Fame
2017Oct Las Vegas Route 91 Memorial
2017Aug Zion Valley Morning Views
2017Aug Milky Way Zion Lodge
2017Aug Zion Lodge: Mule Deer and Sunset
2017Aug Angels Landing Trail, Zion NP
2016Nov Las Vegas Sights
2015Oct Henderson and Las Vegas Views
2015Oct Death Valley National Park
2015Oct Zion NP: Kolob Terrace Rd and Kolob Canyons
2016Nov Grand Canyon South Rim
2016Jul Cherry Creek Arts Festival
2015Sept Rocky Mountain Natl Park
2016Oct IKEA Bathroom Remodel
2016Nov Salton Sea, CA
2015July Squirrel breakfasting on maple seeds
2016Aug Yellowstone Natl Park
2016Sep Glacier Natl Park
2016Jun Devil's Tower Lookout, Pike Natl Forest
2016Apr Iceland Coast
2016Mar Roatan Dive 14: Mr Bud Wreck
2016Mar Roatan Dive 13: Mary's Place
2016Mar Roatan Dive 12: Prince Albert/DC-3
2016Mar Roatan Dive 11: Ventana Del
2016Mar Roatan Dive 10: Prince Albert
2016Mar Roatan Dive 9: French Cut Cay
2016Mar Roatan Dive 8: CoCo View Wall
2016Mar Roatan Dive 7: Menagerie
2016Mar Roatan Dive 6: CoCo View Wall
2016Mar Roatan Dive 5: First Bight
2016Mar Roatan Dive 4: CoCoView Wall
2016Mar Roatan Dive 3: Green Reef
2016Mar Roatan Dive 2 Prince Albert
2016Mar Houston to Roatan
2016Mar Over Houston at Night
2015Oct Las Vegas Neon Sign Musuem
2015Aug Rocky Mountain Natl Park: Old Fall River Road
2015Oct Boston Tourist
2015Oct Newport Mansions
2015Oct Zion National Park, The Narrows
2015Sept Lunar Eclipse
2015Aug Rocky Mountain Natl Park Marmots
2015 Aug Denver Squirrels
2015Jun Iceland
2015 May Boston Skyline Superwide
2015Aug Strawberries at breakfast
2015Apr Dominica Middleham Falls Hike
2015Mar Dominica Landside
2015Jul WeinerMobile in Denver
2015Jun Boston rooftop views
2015Jun Fenway Park from rooftop
2015Jun Boston MFA Snack
2015Jun Abandoned Colorado Farm
2015Jun Elk in Rocky Mountain Natl Park
2014Aug Bees in Honeysuckle
2015Jun Rocky Mountain National Park, without elk
2015Apr Dominica Dive 15: Lab'ym - Dangleben's North
2014Apr Dominica Dive 14: The Well
2015Apr Dominica Dive 13: Dangleben's Pinnacles - Coral Gardens
2015Apr Dominica Dive 12: Soufriere Pinnacles
2015Apr Dominica Dive 11: Night Dive Champagne Reef
2015Apr Dominica Dive 10: Champagne Reef
2015Apr Dominica Dive 9: Scottshead Point
2015Mar Dominica Dive 8: Champagne Reef
2015Mar Dominica Dive 7: Point Guinard
2015Mar Dominica Dive 6: Soufriere Pinnacles
2015Mar Dominica Dive 5: Scott's Head Dropoff
2015Mar Dominica Dive 4 Coral Gardens
2015Mar Dominica Dive 3 Lab'ym
2015Feb Kawaii Gifts 2 180mm Sigma Macro
2015Feb Kawaii Gifts Wide Angle/Superwide
2015Feb Kawaii Gifts Superwide HDR
2015Feb Kawaii Gifts: Macro 180mm Sigma, 105mm Nikkor
2014Dec Denver Zoo
2015Jan DIA with 300mm f2.8 VR
2015Jan Denver Cherry Creek Night D800e
2014Aug Sweden - Uppsala & Stockholm
2014Nov Winter Cherries and Birds
2014Nov Backyard Wildlife
2014Nov Baby Gorilla Playing Pittsburgh Zoo
2014Oct Fall Cherries and Birds D800e
2014Oct Fall Cherries and Birds 300mm f2.8 VR
2014Dec Squirrel picnic in the backyard
2014Sept National Aviary Pittsburgh
2014Oct 180mm Sigma Macro
2014Nov Pittsburgh Zoo
2014Sept Pittsburgh Zoo
2014Aug Phipps Conservatory: Butterflies, Flowers, Bees
Getting to know the D800e
2014Sep Pittsburgh Zoo 1
Getting to know the 300mm f2.8 VR
2014 Random Fun Photos
2014July Pittsburgh Zoo
2014June Summer Flowers and Insects Pittsburgh
2014May Denver Flowers and Insects
2014May Frick Mansion and Park, Pittsburgh PA
2014Apr CMU Carnival with Wayne and Weston
2014Apr Spring in Pittsburgh
2014Mar Macro shots: Nikon 105 VR
2014Mar Bonaire Scuba Fisheye 10.5mm
2014Mar Bonaire east coast dive - Boca Onima
2014Mar Bonaire Scuba Macro Photos
2014Mar - Scuba Camera Dome Port Helmet
2014Jan Denver Ducks
2014 Random Sights
2013Nov Winter Cherries and Birds
2013Nov First snowfall in Pittsburgh
2013Oct Giant Rubber Duck Pittsburgh
2013 Random Sights
2013Sep-Nov Fall Cherries, Flowers, Birds, and Bees
2013Sept Full Moon 500mm D7100
2012Aug (ongoing) Macro shots
2011May Royal Air Force Museum
2011May Tank Museum, Bovington UK
2013Sept Playing with 10.5mm Fisheye
2013June Montpellier, France minus Tour de France
2013Aug Giant Green Moray Eel, Key Largo, FL, City of Washington
2013Aug Key Largo Scuba Diving
2013July-August Summer Flowers, Bees, and Bugs D7100
2013July London Weekend
2013July Tour de France Stage 7: Montpellier to Albi, Just the Riders
2013July Tour de France Stage 6: Aix to Montpellier, Just the Riders
2011May London
2011Aug Pittsburgh Airshow
2011 NYC Christmas and random sights
2012Jun Aberdeen Proving Grounds Museum
2012 Random Photos
2012Aug Visiting the Tromp, a Dutch frigate, in Bonaire
2012Apr & 2013May Falling Water - Frank Lloyd Wright
2013 Squirrel Action
2013Apr CMU Carnival with Wayne and his family (Public)
2013Apr Musca domestica - the housefly D7100
2013Apr Tiny baby bristlenose plecos in aquarium
2013Apr Flowers and Bees D7100
2013Mar Signs of Spring D7100
2013Mar Key Largo Scuba Diving
2007 Denver Squirrels
2013Jan-Feb Chilly Cardinals
2011Jan New Zealand Trip
2010Dec Australia Trip
2012Nov GoGopher upgrade
2012Aug Bonaire scuba diving
View More
Scroll To Top
Slideshow
By Email
Link:
Copy Link
Print
?
Close Sidebar
Willis Chung
PRO
Follow
Following
Unfollow
Contact
Photo Details
Date
Dimensions
Size
File
Camera
ISO Speed
Exposure
Aperture
Focal Length
Flash
Display Image Quality
Tags
Comments
No comments yet...
All fields are required, fill in the form.
Comment successfully added.
Comment
New comments notifications
Audio Mute
Prev
Play
Next
Shuffle
Include
Privacy and cookie policy
This site uses cookies to enhance your browsing experience, serve personalized content, and analyze traffic. By continuing to use this site you agree to
use of cookies and stewardship of your data
.


No comments yet...
All fields are required, fill in the form.
Comment successfully added.
Comment