
Built the base extension out of 2x4s.Capture Date: Oct 16, 2016 06:05 PM•Views: 4382No comments yet. All fields are required, fill in the form. Comment successfully added. Comment
|
Test fit cabinet on top of base. Looks like the right height below mirror to fit countertop in.
I am just about to make another mistake. Pulling the countertop out, I pulled on the middle of the board across the front and broke it.
Capture Date: Oct 16, 2016 06:59 PM•Views: 4275
No comments yet. All fields are required, fill in the form. Comment successfully added. Comment
|
Arrrrgh! Broken front upper cabinet panel. No way to repair it and have it look good.
Options: 1) buy another cabinet for this one piece. 2) find something else at IKEA that uses this material and is less expensive. Time for another trip back to IKEA.
Capture Date: Oct 16, 2016 09:24 PM•Views: 4288
No comments yet. All fields are required, fill in the form. Comment successfully added. Comment
|
Before I go back to IKEA, test fit the countertop on top of all three cabinets.
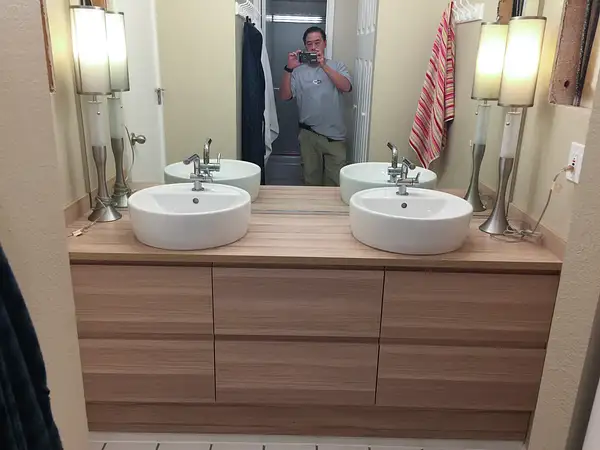
Dimensions worked out perfectly! Countertop is snug underneath the mirror. Haven't replaced the mirror yet (can you find the spot on the mirror?). Busted cabinet is on the left. Cabinets aren't pushed fully back against the wall yet, it's a tight fit, no need to push them back now since I have to rebuild one of them.
Capture Date: Oct 16, 2016 09:34 PM•Views: 4304
No comments yet. All fields are required, fill in the form. Comment successfully added. Comment
|
Found the mistake I made cutting the countertop. Ooops!
I didn't support the cutoff piece. When I got to the end of the cut, the waste piece rotated downward and pulled off a piece of the finished surface of the countertop. I was thinking of going without a side splash panel, but not now.
Capture Date: Oct 16, 2016 09:39 PM•Views: 4201
No comments yet. All fields are required, fill in the form. Comment successfully added. Comment
|
Tried filling the defect with a piece of edging supplied by IKEA with the countertop. No go.
I couldn't find the broken off piece in the cutting area. It was a day or two after cutting that I pulled off the tape and found the damage. Another reason to go back to IKEA.
Capture Date: Oct 16, 2016 09:57 PM•Views: 4133
No comments yet. All fields are required, fill in the form. Comment successfully added. Comment
|
Testing a scrap of the countertop to use as a side splash.
Sure covers up the broken part of the new countertop. The 1 1/8 thick countertop looks too wide to be right as a side panel. The need for the side panels makes it important to replace the mirror before attaching the side panels to the wall.
Capture Date: Oct 16, 2016 09:58 PM•Views: 4142
No comments yet. All fields are required, fill in the form. Comment successfully added. Comment
|
Checking fit of kick plate along front of the base. Looks pretty good!
The small space below the kick plate will get filled in by a thin white melamine board.
Capture Date: Oct 17, 2016 08:16 AM•Views: 4160
No comments yet. All fields are required, fill in the form. Comment successfully added. Comment
|
Drawers built, waiting for installation. Light color inside much warmer than sunlight outside.Capture Date: Oct 17, 2016 10:54 AM•Views: 3982No comments yet. All fields are required, fill in the form. Comment successfully added. Comment
|
At IKEA, I found this drawer in the As-Is department.
I had hoped that I could use it as a donor for the top front panel I broke, but the drawer sides weren't thick enough and the front isn't wide enough. However, the sides were long enough for me to make the side splash panels.
Capture Date: Oct 17, 2016 07:36 PM•Views: 3872
No comments yet. All fields are required, fill in the form. Comment successfully added. Comment
|
Testing location of sinks. I wanted them snugged a bit closer together.
Putting one in the center of each of the cabinets would have made them feel too distant, and would make the space on the sides much less useful.
Capture Date: Oct 18, 2016 09:33 AM•Views: 3798
No comments yet. All fields are required, fill in the form. Comment successfully added. Comment
|
Pulling cardboard support out, the location of the drain gets marked.Capture Date: Oct 18, 2016 09:42 AM•Views: 3765No comments yet. All fields are required, fill in the form. Comment successfully added. Comment
|
Cutting out template from instructions, cut hole is marked.
Note that there is more material cut out closer to the wall for the faucet hoses.
Capture Date: Oct 18, 2016 09:46 AM•Views: 4543
No comments yet. All fields are required, fill in the form. Comment successfully added. Comment
|
Holes marked for cutting.
Masking tape mark where the sides of the sink reach.
Capture Date: Oct 18, 2016 09:50 AM•Views: 3700
No comments yet. All fields are required, fill in the form. Comment successfully added. Comment
|
Back outside, 1/2 inch hole boring bit makes corner holes.
These don't have to be good cuts, since they are covered by the sink.
Capture Date: Oct 18, 2016 09:56 AM•Views: 3574
No comments yet. All fields are required, fill in the form. Comment successfully added. Comment
|


No comments yet...
All fields are required, fill in the form.
Comment successfully added.
Comment