The Blog
Search
Search
Exhibit
Fresh Photos
Editor's Choice Photos
Photoblogs
Upgrade
PRICING
Login
Start
Your 14-Day Free
Trial
Where you store your photos is as important as the photos you take.
Start Trial Now!
»
Back
Back
2016Oct IKEA Bathroom Remodel
By Willis Chung
;
Dec 31, 2016
82 Photos
Share Album
Justified View
Flow View
Square View
Grid View
Journal View
Highlight View
Large Photo View
Slideshow
Proofing View
TV View
RSS
Willis Chung
Featured
Gallery
Favorites
Contact
Contact
Menu
Back
Back
2016Oct IKEA Bathroom Remodel
Dec 31, 2016
82 Photos
Share Album
Justified View
Flow View
Square View
Grid View
Journal View
Highlight View
Large Photo View
Slideshow
Proofing View
TV View
RSS
Featured
Gallery
Favorites
Contact
Contact
Menu
×
Willis Chung's Gallery
2016Oct IKEA Bathroom Remodel
https://willischung.slickpic.com/albums/2016Oct-IKEA-Bathroom-Remodel/photo/#13351751
The bathroom to be replaced, dates from the 1970s
Built in cabinet 71 inches wide, and the tile floor goes up to the bottom of the cabinets, not under it. Big countertop as well. None of these items is standard at a Home Depot or Lowe's
https://willischung.slickpic.com/albums/2016Oct-IKEA-Bathroom-Remodel/photo/#13351052
Woah! Modular cabinets at IKEA! Three of the 23 5/8 inch cabinets fill the space!
Spotted at the Centennial, Colorado, USA IKEA
https://willischung.slickpic.com/albums/2016Oct-IKEA-Bathroom-Remodel/photo/#13351053
I always liked vessel sinks, and I can cut a kitchen countertop down to size.
https://willischung.slickpic.com/albums/2016Oct-IKEA-Bathroom-Remodel/photo/#13351055
Cleaning out the old cabinet, I found this many bottles of glass cleaner!
The old mirror has to go, there is an area that has lost it's silvering. It is small, about 1/4 inch in diameter, but it is low and in an area that is easily seen. You can't not see it once you've spotted it.
https://willischung.slickpic.com/albums/2016Oct-IKEA-Bathroom-Remodel/photo/#13351057
Doors off the old cabinet.
Can you spot the unsilvered part of the mirror on the lower left? It looks like there is a black spot on the edge of the door trim closest to the countertop. Now try not finding that spot in the other photos.
https://willischung.slickpic.com/albums/2016Oct-IKEA-Bathroom-Remodel/photo/#13351060
Marble backsplash hammered off.
Did you find the spot on the mirror?
https://willischung.slickpic.com/albums/2016Oct-IKEA-Bathroom-Remodel/photo/#13351063
Countertop with molded-in sink removed. That was very difficult to haul downstairs.
https://willischung.slickpic.com/albums/2016Oct-IKEA-Bathroom-Remodel/photo/#13351066
Cabinet frame removed. I am leaving the base in place for now.
I am not sure how the new cabinets will sit on the base, so I will build one to test fit in the space before making a decision on the base.
https://willischung.slickpic.com/albums/2016Oct-IKEA-Bathroom-Remodel/photo/#13351069
At IKEA, the goodies are purchased and then brought home.
https://willischung.slickpic.com/albums/2016Oct-IKEA-Bathroom-Remodel/photo/#13351072
Test fit of cabinet shows that platform needs to be narrower and higher.
The original cabinet and countertop were way too low. By raising the new countertop to the bottom of the edge of the mirror, the vessel sinks will rise up enough to make it comfortable for an adult to use the sinks.
https://willischung.slickpic.com/albums/2016Oct-IKEA-Bathroom-Remodel/photo/#13351075
Wood platform from base taken off, raising cabinets by width of a 2x4 will do the job
US wood stud standard dimension is 2x4 inches before finishing. It becomes 1 5/8 x 3 5/8 inches once finished.
https://willischung.slickpic.com/albums/2016Oct-IKEA-Bathroom-Remodel/photo/#13351078
Now to cut the EKBACKEN countertop to the right length and width
I used all the tricks for cutting laminated MDF: 1) the circular saw is going to rest on the unfinished side so the teeth rip upwards into the laminate, 2) tape on the cut line, and 3) heavily score the cut line with a utility knife.
https://willischung.slickpic.com/albums/2016Oct-IKEA-Bathroom-Remodel/photo/#13351081
Deep score along cut line of finished surface
Used the old marble backsplash finished edge as my straightedge.
https://willischung.slickpic.com/albums/2016Oct-IKEA-Bathroom-Remodel/photo/#13351085
Getting set up for long rip cut. Measure twice, cut once...
I am just about to make a bit of a mistake that you will see in the later photos.
https://willischung.slickpic.com/albums/2016Oct-IKEA-Bathroom-Remodel/photo/#13351088
Cut completed! The cutoff piece is going to be the kick panel at the front of the base.
The mistake I made was not supporting the cutoff piece. When I got to the end of the cut, it rotated downward and pulled off a piece of the finished surface of the countertop!
https://willischung.slickpic.com/albums/2016Oct-IKEA-Bathroom-Remodel/photo/#13351092
Built the base extension out of 2x4s.
https://willischung.slickpic.com/albums/2016Oct-IKEA-Bathroom-Remodel/photo/#13351095
Test fit cabinet on top of base. Looks like the right height below mirror to fit countertop in.
I am just about to make another mistake. Pulling the countertop out, I pulled on the middle of the board across the front and broke it.
https://willischung.slickpic.com/albums/2016Oct-IKEA-Bathroom-Remodel/photo/#13351099
Arrrrgh! Broken front upper cabinet panel. No way to repair it and have it look good.
Options: 1) buy another cabinet for this one piece. 2) find something else at IKEA that uses this material and is less expensive. Time for another trip back to IKEA.
https://willischung.slickpic.com/albums/2016Oct-IKEA-Bathroom-Remodel/photo/#13351103
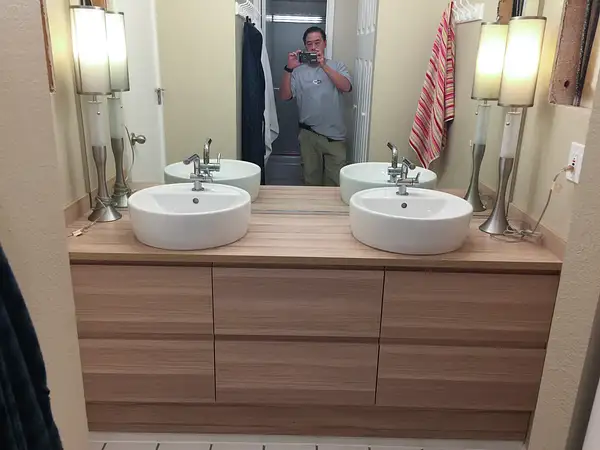
Before I go back to IKEA, test fit the countertop on top of all three cabinets.
Dimensions worked out perfectly! Countertop is snug underneath the mirror. Haven't replaced the mirror yet (can you find the spot on the mirror?). Busted cabinet is on the left. Cabinets aren't pushed fully back against the wall yet, it's a tight fit, no need to push them back now since I have to rebuild one of them.
https://willischung.slickpic.com/albums/2016Oct-IKEA-Bathroom-Remodel/photo/#13351106
Found the mistake I made cutting the countertop. Ooops!
I didn't support the cutoff piece. When I got to the end of the cut, the waste piece rotated downward and pulled off a piece of the finished surface of the countertop. I was thinking of going without a side splash panel, but not now.
https://willischung.slickpic.com/albums/2016Oct-IKEA-Bathroom-Remodel/photo/#13351109
Tried filling the defect with a piece of edging supplied by IKEA with the countertop. No go.
I couldn't find the broken off piece in the cutting area. It was a day or two after cutting that I pulled off the tape and found the damage. Another reason to go back to IKEA.
https://willischung.slickpic.com/albums/2016Oct-IKEA-Bathroom-Remodel/photo/#13351117
Testing a scrap of the countertop to use as a side splash.
Sure covers up the broken part of the new countertop. The 1 1/8 thick countertop looks too wide to be right as a side panel. The need for the side panels makes it important to replace the mirror before attaching the side panels to the wall.
https://willischung.slickpic.com/albums/2016Oct-IKEA-Bathroom-Remodel/photo/#13351753
Checking fit of kick plate along front of the base. Looks pretty good!
The small space below the kick plate will get filled in by a thin white melamine board.
https://willischung.slickpic.com/albums/2016Oct-IKEA-Bathroom-Remodel/photo/#13351132
Drawers built, waiting for installation. Light color inside much warmer than sunlight outside.
https://willischung.slickpic.com/albums/2016Oct-IKEA-Bathroom-Remodel/photo/#13351138
At IKEA, I found this drawer in the As-Is department.
I had hoped that I could use it as a donor for the top front panel I broke, but the drawer sides weren't thick enough and the front isn't wide enough. However, the sides were long enough for me to make the side splash panels.
https://willischung.slickpic.com/albums/2016Oct-IKEA-Bathroom-Remodel/photo/#13351141
Testing location of sinks. I wanted them snugged a bit closer together.
Putting one in the center of each of the cabinets would have made them feel too distant, and would make the space on the sides much less useful.
https://willischung.slickpic.com/albums/2016Oct-IKEA-Bathroom-Remodel/photo/#13351147
Pulling cardboard support out, the location of the drain gets marked.
https://willischung.slickpic.com/albums/2016Oct-IKEA-Bathroom-Remodel/photo/#13351152
Cutting out template from instructions, cut hole is marked.
Note that there is more material cut out closer to the wall for the faucet hoses.
https://willischung.slickpic.com/albums/2016Oct-IKEA-Bathroom-Remodel/photo/#13351158
Holes marked for cutting.
Masking tape mark where the sides of the sink reach.
https://willischung.slickpic.com/albums/2016Oct-IKEA-Bathroom-Remodel/photo/#13351164
Back outside, 1/2 inch hole boring bit makes corner holes.
These don't have to be good cuts, since they are covered by the sink.
https://willischung.slickpic.com/albums/2016Oct-IKEA-Bathroom-Remodel/photo/#13351172
Jig saw used to connect the dots.
I put down tape before cutting so that the foot of the saw doesn't mess up the finish if it bounces up and down.
https://willischung.slickpic.com/albums/2016Oct-IKEA-Bathroom-Remodel/photo/#13351179
Bombs away! It is OK if this piece drops out while cutting.
https://willischung.slickpic.com/albums/2016Oct-IKEA-Bathroom-Remodel/photo/#13351187
Caulk used to waterproof the cut edge. All cut edges were sealed.
I used clear caulk for the cut outside edges. May be overkill, but it is cheap insurance against a small leak causing the material to swell.
https://willischung.slickpic.com/albums/2016Oct-IKEA-Bathroom-Remodel/photo/#13351195
Base extension and kick plate anchored in place. Leveled carefully.
https://willischung.slickpic.com/albums/2016Oct-IKEA-Bathroom-Remodel/photo/#13351202
This is the bottom panel of the center cabinet, and I will make a replacement front panel out of it.
I realized the back of the panel isn't adding any strength to the assembled unit, and I can trim the needed 2-3 inches out of it and nobody will see it.
https://willischung.slickpic.com/albums/2016Oct-IKEA-Bathroom-Remodel/photo/#13351211
Donor panel removed
https://willischung.slickpic.com/albums/2016Oct-IKEA-Bathroom-Remodel/photo/#13351218
Donor panel compared to broken top panel.
https://willischung.slickpic.com/albums/2016Oct-IKEA-Bathroom-Remodel/photo/#13351224
Cut replacement top panel. The operation was successful!
https://willischung.slickpic.com/albums/2016Oct-IKEA-Bathroom-Remodel/photo/#13351230
The left cabinet drawers need to be trimmed so they can clear the door trim.
Something that I hadn't anticipated at the store: the drawers go all the way to the edge of the cabinets. That leaves only 6 inches of extension of the drawers until they hit the trim. I will cut off the edge and glue the cut off piece onto the cabinet front edge as a trim piece.
https://willischung.slickpic.com/albums/2016Oct-IKEA-Bathroom-Remodel/photo/#13351237
Both the inside and outside surfaces of the drawer front need to be "good" cuts. Precautions taken.
Both sides taped, scored, and the drawer front is sandwiched between two sacrificial MDF boards. The outside surface of the drawer is down, so that will be the side least likely to be damaged during the cut.
https://willischung.slickpic.com/albums/2016Oct-IKEA-Bathroom-Remodel/photo/#13351246
Many clamps used to hold the guide panel, sacrificial boards, and drawer front in place.
I don't want to have to buy another cabinet to get another set of drawer fronts, so I'd better not mess this cut up.
https://willischung.slickpic.com/albums/2016Oct-IKEA-Bathroom-Remodel/photo/#13351255
Snugging a dowel into the curved top edge of the drawer to support the laminate there during the cut
https://willischung.slickpic.com/albums/2016Oct-IKEA-Bathroom-Remodel/photo/#13351262
Cut successful! Outside and inside surfaces are good.
Now to do it again on the other drawer front.
https://willischung.slickpic.com/albums/2016Oct-IKEA-Bathroom-Remodel/photo/#13351269
Gluing matching edging pieces on with rubber contact cement.
This works surprisingly well. The adhesive becomes dry to the touch in about 15 minutes, and is pretty tenacious once you put the treated surfaces together.
https://willischung.slickpic.com/albums/2016Oct-IKEA-Bathroom-Remodel/photo/#13351276
Glued pieces ready for trimming with a sharp utility knife.
https://willischung.slickpic.com/albums/2016Oct-IKEA-Bathroom-Remodel/photo/#13351285
Stuffed animals enjoying the prospect of plumbing.
I was very impressed with what is supplied with the sinks. Pretty much everything you need to go from the sink to the trap adapter in the wall. Makes sense that it would be included, since there is not much space under the countertop or behind the drawers. Having a purpose designed drain in the package makes the install much quicker.
https://willischung.slickpic.com/albums/2016Oct-IKEA-Bathroom-Remodel/photo/#13351290
Replacement top panel installed in cabinet. Looks pretty good!
The gaps on the sides will get closed up when the cabinets are forced into place. It's a tight fit to get all three cabinets in position. I will _not_ put any pressure on the top panels in front!
https://willischung.slickpic.com/albums/2016Oct-IKEA-Bathroom-Remodel/photo/#13351293
Wall repaired and textured. Profile of old cabinets is visible.
https://willischung.slickpic.com/albums/2016Oct-IKEA-Bathroom-Remodel/photo/#13351297
Here is that spot on the mirror! At this point, I called in the mirror guys.
I had a few days to wait while the mirror was cut to size. A bit pricey, but worth getting this taken care of.
https://willischung.slickpic.com/albums/2016Oct-IKEA-Bathroom-Remodel/photo/#13351300
Repair and painting of wall on other side. Paint is still drying, wet paint looking a bit lighter.
2015Sept Rocky Mountain Natl Park
2016Nov Salton Sea, CA
Day 1 Bishop Museum Quick Visit
Day 1 Hawaii State Art Museum
Day 0 Laylow Waikiki Short Stay
2022 May Oahu
2019July American Heritage Museum
2019July Northeastern southwest campus
2019July 4th Of July in Boston with the Elliotts
2019 July Boston Visit With John
2019Aug Japan
2019Mar Oahu
2019Mar Yayoi Kusama Bellagio Gallery of Fine Art
2006Sep Streamside Drive
2018Aug Nashville
2017May Capitol Reef National Park, Utah
2017Nov Ethyl M Cactus Garden Holiday Lights LV NV
2017Nov Boston Visit
2018Sep Hoover Dam
2018Aug Boston Visit
2018Aug Boston Fenway Ducks
2018May Prague
2018May Budapest
2018Mar Battleship Cove
2018Mar The Breakers with Ben
2018Apr Ikea Mirror Barn Door
2017Mar Prague
2017Mar Budapest
2017Nov Las Vegas High School Rodeo
2017Sep Seven Magic Mountains, Las Vegas, NV
2017Sep International Car Forest of the Last Church, Goldfield, Nevada
2017Sep Bullfrog-Rhyolite Cemetery
2017Sep Goldwell Open Air Museum, Rhyolite NV
2017Sep Tom Kelly's Bottle House, Rhyolite, NV
2017Sep Rhyolite NV Ghost Town
2017Sep Las Vegas Pinball Hall of Fame
2017Oct Las Vegas Route 91 Memorial
2017Aug Zion Valley Morning Views
2017Aug Milky Way Zion Lodge
2017Aug Zion Lodge: Mule Deer and Sunset
2017Aug Angels Landing Trail, Zion NP
2016Nov Las Vegas Sights
2015Oct Henderson and Las Vegas Views
2015Oct Death Valley National Park
2015Oct Zion NP: Kolob Terrace Rd and Kolob Canyons
2016Nov Grand Canyon South Rim
2016Jul Cherry Creek Arts Festival
2015Sept Rocky Mountain Natl Park
2016Oct IKEA Bathroom Remodel
2016Nov Salton Sea, CA
2015July Squirrel breakfasting on maple seeds
2016Aug Yellowstone Natl Park
2016Sep Glacier Natl Park
2016Jun Devil's Tower Lookout, Pike Natl Forest
2016Apr Iceland Coast
2016Mar Roatan Dive 14: Mr Bud Wreck
2016Mar Roatan Dive 13: Mary's Place
2016Mar Roatan Dive 12: Prince Albert/DC-3
2016Mar Roatan Dive 11: Ventana Del
2016Mar Roatan Dive 10: Prince Albert
2016Mar Roatan Dive 9: French Cut Cay
2016Mar Roatan Dive 8: CoCo View Wall
2016Mar Roatan Dive 7: Menagerie
2016Mar Roatan Dive 6: CoCo View Wall
2016Mar Roatan Dive 5: First Bight
2016Mar Roatan Dive 4: CoCoView Wall
2016Mar Roatan Dive 3: Green Reef
2016Mar Roatan Dive 2 Prince Albert
2016Mar Houston to Roatan
2016Mar Over Houston at Night
2015Oct Las Vegas Neon Sign Musuem
2015Aug Rocky Mountain Natl Park: Old Fall River Road
2015Oct Boston Tourist
2015Oct Newport Mansions
2015Oct Zion National Park, The Narrows
2015Sept Lunar Eclipse
2015Aug Rocky Mountain Natl Park Marmots
2015 Aug Denver Squirrels
2015Jun Iceland
2015 May Boston Skyline Superwide
2015Aug Strawberries at breakfast
2015Apr Dominica Middleham Falls Hike
2015Mar Dominica Landside
2015Jul WeinerMobile in Denver
2015Jun Boston rooftop views
2015Jun Fenway Park from rooftop
2015Jun Boston MFA Snack
2015Jun Abandoned Colorado Farm
2015Jun Elk in Rocky Mountain Natl Park
2014Aug Bees in Honeysuckle
2015Jun Rocky Mountain National Park, without elk
2015Apr Dominica Dive 15: Lab'ym - Dangleben's North
2014Apr Dominica Dive 14: The Well
2015Apr Dominica Dive 13: Dangleben's Pinnacles - Coral Gardens
2015Apr Dominica Dive 12: Soufriere Pinnacles
2015Apr Dominica Dive 11: Night Dive Champagne Reef
2015Apr Dominica Dive 10: Champagne Reef
2015Apr Dominica Dive 9: Scottshead Point
2015Mar Dominica Dive 8: Champagne Reef
2015Mar Dominica Dive 7: Point Guinard
2015Mar Dominica Dive 6: Soufriere Pinnacles
2015Mar Dominica Dive 5: Scott's Head Dropoff
2015Mar Dominica Dive 4 Coral Gardens
2015Mar Dominica Dive 3 Lab'ym
2015Feb Kawaii Gifts 2 180mm Sigma Macro
2015Feb Kawaii Gifts Wide Angle/Superwide
2015Feb Kawaii Gifts Superwide HDR
2015Feb Kawaii Gifts: Macro 180mm Sigma, 105mm Nikkor
2014Dec Denver Zoo
2015Jan DIA with 300mm f2.8 VR
2015Jan Denver Cherry Creek Night D800e
2014Aug Sweden - Uppsala & Stockholm
2014Nov Winter Cherries and Birds
2014Nov Backyard Wildlife
2014Nov Baby Gorilla Playing Pittsburgh Zoo
2014Oct Fall Cherries and Birds D800e
2014Oct Fall Cherries and Birds 300mm f2.8 VR
2014Dec Squirrel picnic in the backyard
2014Sept National Aviary Pittsburgh
2014Oct 180mm Sigma Macro
2014Nov Pittsburgh Zoo
2014Sept Pittsburgh Zoo
2014Aug Phipps Conservatory: Butterflies, Flowers, Bees
Getting to know the D800e
2014Sep Pittsburgh Zoo 1
Getting to know the 300mm f2.8 VR
2014 Random Fun Photos
2014July Pittsburgh Zoo
2014June Summer Flowers and Insects Pittsburgh
2014May Denver Flowers and Insects
2014May Frick Mansion and Park, Pittsburgh PA
2014Apr CMU Carnival with Wayne and Weston
2014Apr Spring in Pittsburgh
2014Mar Macro shots: Nikon 105 VR
2014Mar Bonaire Scuba Fisheye 10.5mm
2014Mar Bonaire east coast dive - Boca Onima
2014Mar Bonaire Scuba Macro Photos
2014Mar - Scuba Camera Dome Port Helmet
2014Jan Denver Ducks
2014 Random Sights
2013Nov Winter Cherries and Birds
2013Nov First snowfall in Pittsburgh
2013Oct Giant Rubber Duck Pittsburgh
2013 Random Sights
2013Sep-Nov Fall Cherries, Flowers, Birds, and Bees
2013Sept Full Moon 500mm D7100
2012Aug (ongoing) Macro shots
2011May Royal Air Force Museum
2011May Tank Museum, Bovington UK
2013Sept Playing with 10.5mm Fisheye
2013June Montpellier, France minus Tour de France
2013Aug Giant Green Moray Eel, Key Largo, FL, City of Washington
2013Aug Key Largo Scuba Diving
2013July-August Summer Flowers, Bees, and Bugs D7100
2013July London Weekend
2013July Tour de France Stage 7: Montpellier to Albi, Just the Riders
2013July Tour de France Stage 6: Aix to Montpellier, Just the Riders
2011May London
2011Aug Pittsburgh Airshow
2011 NYC Christmas and random sights
2012Jun Aberdeen Proving Grounds Museum
2012 Random Photos
2012Aug Visiting the Tromp, a Dutch frigate, in Bonaire
2012Apr & 2013May Falling Water - Frank Lloyd Wright
2013 Squirrel Action
2013Apr CMU Carnival with Wayne and his family (Public)
2013Apr Musca domestica - the housefly D7100
2013Apr Tiny baby bristlenose plecos in aquarium
2013Apr Flowers and Bees D7100
2013Mar Signs of Spring D7100
2013Mar Key Largo Scuba Diving
2007 Denver Squirrels
2013Jan-Feb Chilly Cardinals
2011Jan New Zealand Trip
2010Dec Australia Trip
2012Nov GoGopher upgrade
2012Aug Bonaire scuba diving
View More
Scroll To Top
Slideshow
By Email
Link:
Copy Link
?
Close Sidebar
Willis Chung
PRO
Follow
Following
Unfollow
Contact
Photo Details
Date
Dimensions
Size
File
Camera
ISO Speed
Exposure
Aperture
Focal Length
Flash
Display Image Quality
Tags
Comments
No comments yet...
All fields are required, fill in the form.
Comment successfully added.
Comment
New comments notifications
Audio Mute
Prev
Play
Next
Shuffle
Include
Privacy and cookie policy
This site uses cookies to enhance your browsing experience, serve personalized content, and analyze traffic. By continuing to use this site you agree to
use of cookies and stewardship of your data
.


No comments yet...
All fields are required, fill in the form.
Comment successfully added.
Comment